LESSON PLANs
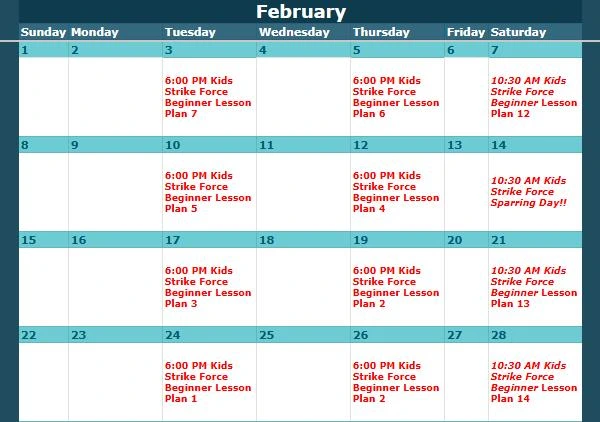
Calendar
Look up the class level and date here, then view the corresponding lesson plan below.
Krav Maga: BEGINNER
January

February

March

April

May

June

July

August

September

October

November

December

Krav Maga: INTERMEDIATE
January

February

March

April

May

June

July

August

September

October

November

December

Krav Maga: ADVANCED
January

February

March

April

May

June

July

August

September

October

November

December

Krav Maga: ELITE
No items found.
Kids Strike Force
January

February
March

April

May

June

July

August

September

October

November

December

Gen-Z Kids: Level 2
January
February

March

April

May

June

July

August

September

October

November

December

LESSON PLAN Details
EACH LESSON BEGINS WITH REVIEW ON COMBATIVES THAT ARE NEEDED IN THE SELF DEFENSE TECHNIQUE
- Stances/Movement
- Straight Punches
- Eye Strikes
- Front Kick to Groin
EACH LESSON BEGINS WITH REVIEW ON COMBATIVES THAT ARE NEEDED IN THE SELF DEFENSE TECHNIQUE
- Mount (Bottom Position)
- Defense vs Punches Mounted (bucking hips)
- Buck, Trap, and Roll vs Full Mount
EACH LESSON BEGINS WITH REVIEW ON COMBATIVES THAT ARE NEEDED IN THE SELF DEFENSE TECHNIQUE
- All punching combinations:
- Jab/Cross/Hook
- Jab/Cross/Hook/Uppercut
- Jab/Cross/Bob/Cross
- Jab/Elbow
- Jab/Cross/Hook/Elbow
- R Upper/L Hook/ R Cross
EACH LESSON BEGINS WITH REVIEW ON COMBATIVES THAT ARE NEEDED IN THE SELF DEFENSE TECHNIQUE
- Chops
- Straight Punch w/ Advance
- Straight Punch w/ Retreat
- Low Straight Punch
- Defense vs Low Straight Punch
EACH LESSON BEGINS WITH REVIEW ON COMBATIVES THAT ARE NEEDED IN THE SELF DEFENSE TECHNIQUE
- Defensive Front Kick
- Side Kick with and without advance
- Back Kick with and without advance
EACH LESSON BEGINS WITH REVIEW ON COMBATIVES THAT ARE NEEDED IN THE SELF DEFENSE TECHNIQUE
- Punches
- Inside Defenses
- 360’s
EACH LESSON BEGINS WITH REVIEW ON COMBATIVES THAT ARE NEEDED IN THE SELF DEFENSE TECHNIQUE
- Ground Position Round Kick
- Ground Side Position
- Ground Side Position & Movement
- Ground Position Side Kick/Axe Kick
EACH LESSON BEGINS WITH REVIEW ON COMBATIVES THAT ARE NEEDED IN THE SELF DEFENSE TECHNIQUE
- Defense vs Headlock from Behind Bar Arm and Carotid
- Hair Grab(front/side/behind)
EACH LESSON BEGINS WITH REVIEW ON COMBATIVES THAT ARE NEEDED IN THE SELF DEFENSE TECHNIQUE
- Strikes(Ground)
- Elbow escape(mount)
- Guard Top Position
- Escaping the Guard
EACH LESSON BEGINS WITH REVIEW ON COMBATIVES THAT ARE NEEDED IN THE SELF DEFENSE TECHNIQUE
- Front Kicks to Vertical Target
- Round Kick
EACH LESSON BEGINS WITH REVIEW ON COMBATIVES THAT ARE NEEDED IN THE SELF DEFENSE TECHNIQUE
- Ground Position and Movement
- Getting up from the ground
- Transition Kick
- Ground Position Front Kick from Groin
EACH LESSON BEGINS WITH REVIEW ON COMBATIVES THAT ARE NEEDED IN THE SELF DEFENSE TECHNIQUE
- Wrist release vs 2 attackers
- Wrist release vs 3 attackers
EACH LESSON BEGINS WITH REVIEW ON COMBATIVES THAT ARE NEEDED IN THE SELF DEFENSE TECHNIQUE
- Choke from the Front
- 2 Handed
- 1 Handed
- Choke from the side
EACH LESSON BEGINS WITH REVIEW ON COMBATIVES THAT ARE NEEDED IN THE SELF DEFENSE TECHNIQUE
- Hammer fists – Forward, Down, Side & Back
- Elbows 1, 2, 3, & 4
EACH LESSON BEGINS WITH REVIEW ON COMBATIVES THAT ARE NEEDED IN THE SELF DEFENSE TECHNIQUE
- All Wrist Releases
- Defense vs Arm Pulls Front, Side, and Behind
- Defense vs Headlock from the side
EACH LESSON BEGINS WITH REVIEW ON COMBATIVES THAT ARE NEEDED IN THE SELF DEFENSE TECHNIQUE
- Palm Strikes
- Knees/Round knees
- Elbows 5, 6, & 7
EACH LESSON BEGINS WITH REVIEW ON COMBATIVES THAT ARE NEEDED IN THE SELF DEFENSE TECHNIQUE
- Hook Punch
- Uppercut
EACH LESSON BEGINS WITH REVIEW ON COMBATIVES THAT ARE NEEDED IN THE SELF DEFENSE TECHNIQUE
- Choke from the front with a push
- Choke from behind with a push
- Defense vs choke from behind
- Bobbing & Weaving
- Basic Sprawl
- Controlling Bent Over Attacker
- Overhand Punch
- Defense vs Hook(Extended/Covering)
- Defense vs Overhand Right(Extended/Covering)
- Defense vs Uppercut
- Pummeling(overhook/underhook)
- Arm Drag
- 2 - Handed Head Control(thai clench)
- Defense vs 2 handed head control(repummel)
- Defense vs 2 handed head control(pluck and strike/eye gouge)
- Sprawl(basic to advanced)
- Fall Breaks
- High(back/side)
- Froward(soft/hard)
- Choke from the side ground(kick to face)
- Choke from the side ground(armbar)
- Headlock from the side(basic position)
- Headlock from the side(weight forward)
- Headlock from the side(weight back)
- Defense vs Full Nelson(leverage on the finger)
- Bearhug from Behind(leverage on the finger)
- Bearhug from Behind (lifting)
- Bearhug from Front (lifting)
- Guard Bottom Position
- Kickoff From the Guard(with/without space)
- Armbar From the Guard
- Stacking from the Guard
- Reflexive defense vs front kick
- Outside stabbing defense vs front kick
- Plucking defense vs low to medium front kick
- Defense vs Bearhug from Behind(arms free)
- Defense vs Bearhug from Behind(arms caught)
- Defense vs Bearhug from Front(arms free)
- Defense vs Bearhug from Front(arms caught)
- Ridge Hand/Mouth of Hand Punches
- Outside Defenses(Palm toward face, palm away, roll up, stabbing)
- Defense vs choke while mounted
- Defense vs headlock while mounted
- Defense vs Choke from Behind while mounted
- 360s with Counters
- Defense vs Foot Grab(axe/inside/outside)
- Inside defense vs medium to high front kick
- Defense vs front kick(stop kick)
- Defense vs low round kick(stopping with the shin)
- Defense vs front kick(redirecting with shin)
- Uppercut Back Kick
- Heel Kick
- Outside Slap Kick
- Inside Slap Kick
- Double Leg Takedown
- Single Leg Takedown(head in/out)
- Defense vs Choke Against the Wall(front/back)
- Defense vs Choke From Behind
- Reverse Headlock
- Back Kick w/ Hammerfist Combination
- Side Kick w/ Hammerfist Combination
- Round Kick w/ Front Leg
- Offensive Back Kick
- Mount Top Position
- Maintaining the Mount
- Escape from the Mount
- Rolls
- Forward
- Back
- Forward to back to stand up
- Forward to back to fall break
- Head-Butt Forward
- Head-Butt Side
- Head-Butt Back
- Front Kick to Groin w/ advance(fighting stance)
- Front Kick to Groin w/ advance(neutral stance)
- Front Kick w/ Front Leg
- Spinning Defensive Back Kick
- Inside Defense w/counter vs left punch
- Inside Defense w/counter vs left punch w/ left hand
- Inside Defense w/counter vs right punch (2 counters)
- Inside Defense w/counter vs right punch (1 counter)
- Lean back and Trap
Warm up: level 1, 2 & 3 punching & kicking combinations
- Figure 4 Lock - (aka Key Lock)
- Triangle(legs) forward to back roll
Warm up: level 1, 2 & 3 punching & kicking combinations
- Headlock from behind on ground (attack)
- Headlock from behind on ground (defense)
Warm up: level 1, 2 & 3 punching & kicking combinations
- Guillotine from the guard (attack) from ground
- Guillotine from the guard (defense) from ground
Warm up: level 1, 2 & 3 punching & kicking combinations
- Pull in and choke vs punch(arm triangle)
- Attacker Straddling, Pinning Wrists - Slide arms/Wrist Lock
Warm up: level 1, 2 & 3 punching & kicking combinations
- Cavaliers (Control/joint manipulation)
- #1 Two hand controlling with option of takedown with step back
- #2 Two hands controlling with option of takedown with step forward
- #3 Using thumbs
- #4 Using elbow
Warm up: level 1, 2 & 3 punching & kicking combinations
- Gun from the front
- Gun from the front to the head
- Gun to the side of the head
Warm up: level 1, 2 & 3 punching & kicking combinations
- Gun from the side- in front of the arm(touching)
- Gun from the front - pushing into the stomach
Warm up: level 1, 2 & 3 punching & kicking combinations
- Defense vs Knee Grab
- Snap Downs
- Inward Angle Knee
Warm up: level 1, 2 & 3 punching & kicking combinations
- Gun from behind, touching (live and dead side)
- Gun from side, behind the arm
Warm up: level 1, 2 & 3 punching & kicking combinations
- Baseball bat swing - 1 hand / 2 hand(forward/back)
Warm up: level 1, 2 & 3 punching & kicking combinations
- Stick defense -General comments
- Stick defense vs. overhead swing
- Stick defense vs. overhead swing off-angle/dead side(1step)
- Stick defense vs. overhead swing off-angle/dead side(2steps)
Warm up: level 1, 2 & 3 punching & kicking combinations
- Chops- inside and outside
- Ridge Hand
- Mouth of hand Pinch
- Swing out hammer fist - Element of surprise with finish combos
Warm up: level 1, 2 & 3 punching & kicking combinations
- Knee Tap - Forward/Back
- Knee Tap - Hyperextension
Warm up: level 1, 2 & 3 punching & kicking combinations
- Defense vs low round Kick(absorbing with thigh)
- Defense vs High Round Kick(reflexive)
- Defense vs High Round Kick(2 point)
- Defense vs High Round Kick(3 point)
Warm up: level 1, 2 & 3 punching & kicking combinations
- Arm Lock on the Ground
- Side Control on Ground (bottom position)
- Side Control(basic position)
- Elbow Escape
- Reversal
Warm up: level 1, 2 & 3 punching & kicking combinations
- Knife attacks - Hand defenses 360 and inside defenses
Warm up: level 1, 2 & 3 punching & kicking combinations
- Defense vs. Side Kick (sideways attacker)
- Sliding defense vs. spinning heel kick
- Kick defense vs. Spinning heel kick
- Defense vs. back kick
Warm up: level 1, 2 & 3 punching & kicking combinations
- General defense vs. medium to high attacks
- Sliding defense vs. high round kick
- Defense vs. high side kick
- Defense vs. low/medium side kick (pluck)
Warm up: level 1, 2 & 3 punching & kicking combinations
- Sweep with forward kick
- Sweep with heel kick
- Round Kick taking out one or both legs
Warm up: level 1, 2 & 3 punching & kicking combinations
- Axe kick
- Spinning outside slap kick
- Heel Kick with Spin
Warm up: level 1, 2 & 3 punching & kicking combinations
- Knife defense - General comments
- Kick defense vs. knife attack from a distance
- Knife kick defense vs. straight stab (Bail out)
- Figure 4 Lock - (aka Key Lock)
- Triangle(legs) forward to back roll
- Headlock from behind on ground (attack)
- Headlock from behind on ground (defense)
- Guillotine from the guard (attack) from ground
- Guillotine from the guard (defense) from ground
- Pull in and choke vs punch(arm triangle)
- Attacker Straddling, Pinning Wrists - Slide arms/Wrist Lock
- Cavaliers (Control/joint manipulation)
- #1 Two hand controlling with option of takedown with step back
- #2 Two hands controlling with option of takedown with step forward
- #3 Using thumbs
- #4 Using elbow
- Hand gun threat from behind at a distance
- Hand gun threat cupping (2 hands)
- Defense vs. bayonet stab - live side/dead side
- Knife threats: front off the body/front touching to either side of neck/in front of arm
- Straight Stab
- Straight Stab (live side)
- Defense against rifle from the side - behind the arm
- Defense against rifle from the side - in front of arm
- Defense against rifle from the front - live side
- Defense against rifle from the front - dead side
Knife defense vs. slash/backhand slash
- Face to face flip or "Sacrifice" throw
- Headlock from behind throw
- Defense vs. headlock from side: being spun inward/neck break
- Machine gun takedown
- One-arm shoulder throw
- Hip roll
Defense vs. full nelson: leverage on finger/forward throw/sweep
EACH LESSON BEGINS WITH REVIEW ON COMBATIVES THAT ARE NEEDED IN THE SELF DEFENSE TECHNIQUE
- Stances/Movement
- Straight Punches
- Front Kick to Groin
EACH LESSON BEGINS WITH REVIEW ON COMBATIVES THAT ARE NEEDED IN THE SELF DEFENSE TECHNIQUE
- Axe Kick
- Defense vs Foot Grab
- Axe
- Inside
- Outside
EACH LESSON BEGINS WITH REVIEW ON COMBATIVES THAT ARE NEEDED IN THE SELF DEFENSE TECHNIQUE
- Defense vs Arm Pulls Front, Side, and Behind
- Wrist Releases
EACH LESSON BEGINS WITH REVIEW ON COMBATIVES THAT ARE NEEDED IN THE SELF DEFENSE TECHNIQUE
- Palm Strikes
- Knees/Round Knee
- Elbows 5,6, & 7
EACH LESSON BEGINS WITH REVIEW ON COMBATIVES THAT ARE NEEDED IN THE SELF DEFENSE TECHNIQUE
- Extended and Front Cover(Head Cover From Punches)
EACH LESSON BEGINS WITH REVIEW ON COMBATIVES THAT ARE NEEDED IN THE SELF DEFENSE TECHNIQUE
- Front Kicks to Vertical Target
EACH LESSON BEGINS WITH REVIEW ON COMBATIVES THAT ARE NEEDED IN THE SELF DEFENSE TECHNIQUE
- Hammer Fists - Forward and Side
- Elbows 1,2,3, & 4
EACH LESSON BEGINS WITH REVIEW ON COMBATIVES THAT ARE NEEDED IN THE SELF DEFENSE TECHNIQUE
- Defense vs Headlock from Behind Bar Arm
- Defense vs Chokes
- Front and Back
EACH LESSON BEGINS WITH REVIEW ON COMBATIVES THAT ARE NEEDED IN THE SELF DEFENSE TECHNIQUE
- Maintaining the Mount
- Striking While Mounted
- Defense vs Punches While Mounted
- Escape the Mount(top position)
EACH LESSON BEGINS WITH REVIEW ON COMBATIVES THAT ARE NEEDED IN THE SELF DEFENSE TECHNIQUE
- Escape the Mount(bottom position)
- Buck, Trap, and Roll
- Elbow Escape
EACH LESSON BEGINS WITH REVIEW ON COMBATIVES THAT ARE NEEDED IN THE SELF DEFENSE TECHNIQUE
- Defense vs Choke While Mounted
- Defense vs Headlock While Mounted
EACH LESSON BEGINS WIT REVIEW ON COMBATIVES THAT ARE NEEDED IN THE SELF DEFENSE TECHNIQUE
- Escaping Guard(bottom position)
- Kickoff From Guard
- Escaping the Guard(top position)
- Exit Guard
- Stacking
- Armbar From Guard
EACH LESSON BEGINS WITH REVIEW ON COMBATIVES THAT ARE NEEDED IN THE SELF DEFENSE TECHNIQUE
- Defense vs Choke From Side
- Kick Off
- Bar Arm
EACH LESSON BEGINS WITH REVIEW ON COMBATIVES THAT ARE NEEDED IN THE SELF DEFENSE TECHNIQUE
- Side Control Position
- Defense vs Side Headlock on Ground
- Weight Forward
- Weight Back
EACH LESSON BEGINS WITH REVIEW ON COMBATIVES THAT ARE NEEDED IN THE SELF DEFENSE TECHNIQUE
- Ground Position and Movement
- Side Position and Movement
- Get Up From ground
- Transition Kick
- Front Kick
- Side Kick
EACH LESSON BEGINS WITH REVIEW ON COMBATIVES THAT ARE NEEDED IN THE SELF DEFENSE TECHNIQUE
- Basic Sprawl
- Two Leg Takedown
- Defensive Front kick
- Side kick (with & without advance)
- Back kick (with & without advance)
- Reflexive defense vs Front kick
- Outside stabbing defense vs front kick
- Plucking defense vs low to medium front kick
- Inside defense vs medium to high front kick
- Defense vs low round kick (stopping with shin)
- Defense vs low round kick (absorbing with thigh)
- Defense vs front kick (stop kick)
- Defense vs front kick (redirecting with shin)